( Need Service? Call or Text for Appointment ) - (619) 485-1600
  • Home
    • About Us
    • Our Suppliers
    • FAQ's
    • Maintenance Tips
    • RC Maintenance Blog
    • Gallery Of Work
    • Testimonials
    • Newsletter Sign-up
  • Specialties
    • B6/B6 Speed Shop
    • RC Chassis & Parts Dye Service
    • RC Motor Testing Analyzer
    • RC Crawler & Scaler Services
    • Tekno RC Kit Building
    • TLR 22 5.0 Race Ready Builds
    • Traxxas Slash Upgrade Package
    • Traxxax Repair
  • Services
    • Electronics
    • Kit Builds
    • Motor Services
    • RC Repairs
    • Tire & Wheel
    • RC Body Painting Service >
      • SKG Custom RC Painting
      • SKG Painting Buggy Bodies
      • SKG Crawler/MonsterTruck Bodies
      • SKG Painting On-Road Bodies
      • SKG Painting Short Course Bodies
      • SKG Truggy/Truck Bodies
    • RC Tune-Up
    • Shock Tuning
    • Straight Axle
    • Transmission & Diff
    • Water-Proofing
  • Pricing
    • Mail Order Service
  • Contact

Don't Replace Your Servo - Increase The Servo Torque

5/14/2021

0 Comments

 
Picture
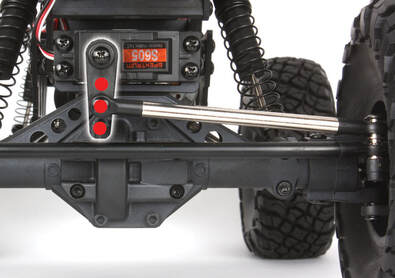
Need more steering-servo power? 
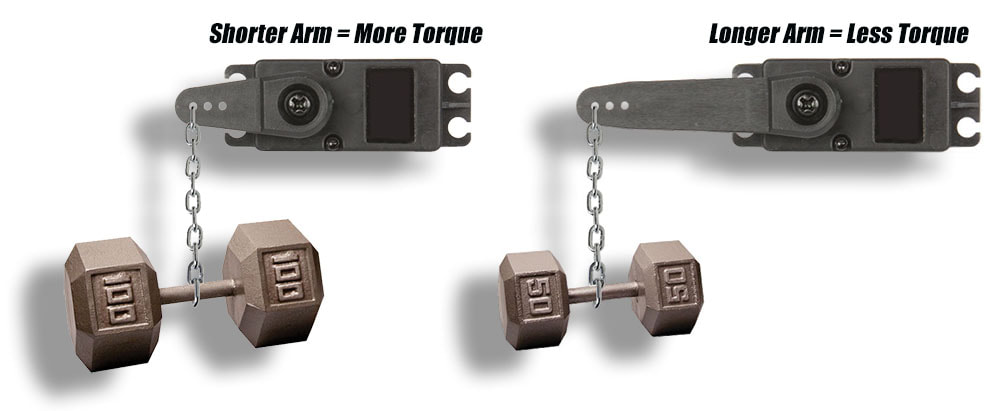
Don't buy a new servo, just use a shorter arm to get more leverage!

​

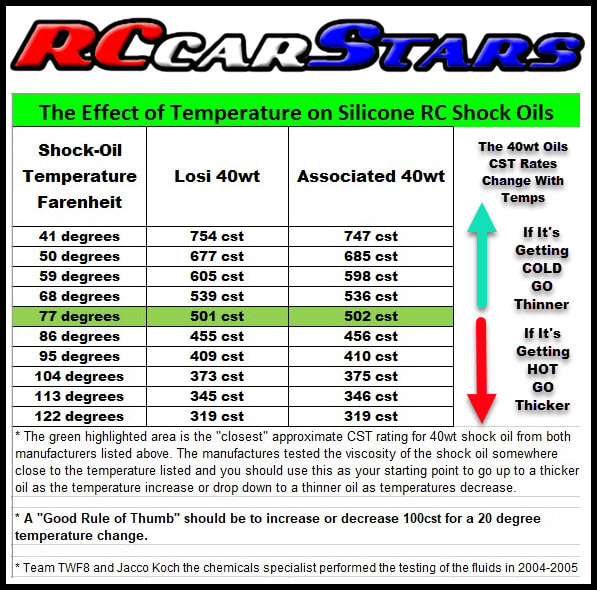
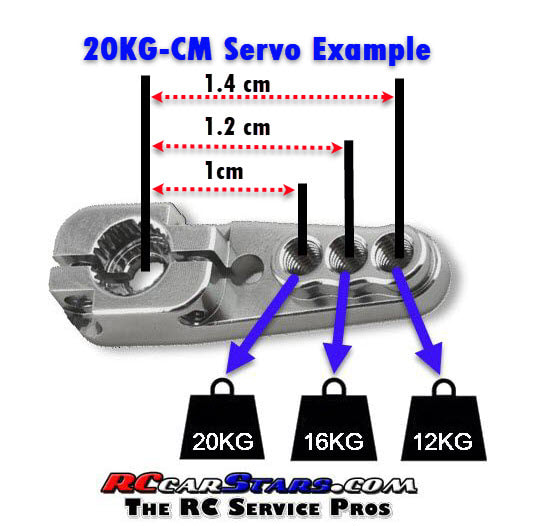
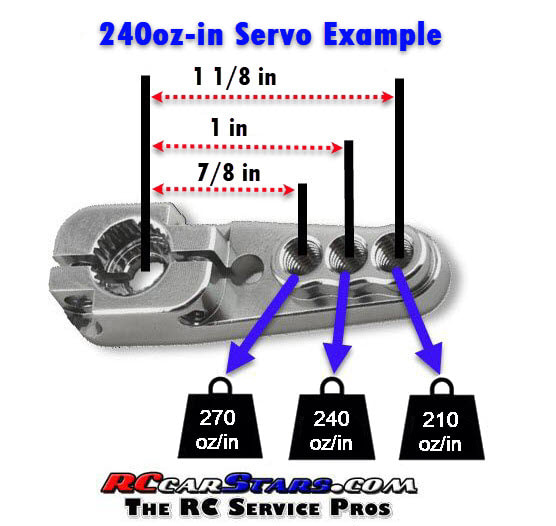
Servo-arm length does affect how much torque is applied to the steering system.  A longer arm will give you less torque, but you will get more steering throw (assuming the steering system can accommodate it). If you install a shorter servo arm, you’ll get the oppo­site: Torque goes up, but you’ll have less steering throw. If your current setup requires you to chop off a significant chunk of travel using endpoint settings, move the servo-arm linkage closer to the output shaft to put more of the servo’s travel (and torque) to work. (Nerd alert: The servo’s actual torque rating never actually changes, of course. Only the amount of torque transmitted via the servo arm changes.)
Picture
 (Nerd alert: The servo’s actual torque rating never actually changes, of course. Only the amount of torque transmitted via the servo arm changes.)
0 Comments

Liquid Wrench For RC Car Traction

5/13/2021

0 Comments

 
Liquid Wrench Penetrating Oil For RC Car Traction
Whether you are racing on indoor clay or asphalt, rubber-tire traction can be one of the main keys to winning. Liquid Wrench (in the yellow can) makes an excellent yet inexpensive tire-traction compound. Just spray liberally onto the tires or onto a towel, rub in, and wait. By the time they call your heat, your rubber tires will be nice and sticky, and the large quantity allows for many race days.
Use Liquid Wrench Penetrating Oil Only
Article Credit: Radio Control CarAction www.rccaraction.com/
0 Comments

RC SILICONE SHOCK OIL COMPARISON CHART

10/20/2020

1 Comment

 
    At RCcarStars we are driven to help all RC hobbyist learn and understand more about our hobby of RC cars.  With that in mind we have done some in-depth research to put together the most up-to-date comprehensive chart that will show you most of the major manufactures oils available on the market.  In addition we have done our best to convert all the "Non-Standard" Weight (WT) to "World-Standard" Centi-Stokes (CST) to compare viscosities.

Please note: we have done our best to take the WT-to-CST conversions right off of the Associated and TLR bottles to assure we have the latest and most up-to-date data.  For XTR, we used some testing results from a large distributor of XTR that seemed to match our personal findings of XTR being very similar in real life viscosity to Associated silicone shock oils.​
RC Silicone Shock Oil wt/cst Comparison Chart
We hope you will find this most up-to-date chart (created 10/18/20) useful in your endeavors to understand what viscosities are available by each manufacture, in addition to the WT-to-CST conversions.

​As always, we hope you enjoy our website and articles to help you enjoy our hobby!!!
PDF File Of Silicone Oil Chart
Click the button above to download a printable version of the chart above!
1 Comment

The Effects of Temperature on Silicone Shock Oil

10/19/2020

1 Comment

 
   When you are racing, you tend to get to the track early in the morning and the temperatures are generally at the coolest point of the day.  We then go onto the track and begin to take practice laps, to not only get down the lines on the track but to feel how the RC car is performing based upon your setup.  One common mistake most racers make when at the track, is failing to make changes to the silicone shock oil as the temperatures change throughout the day.

Here is a good example:

In Southern California we race off-road 8 scale outdoors in very desert like conditions.  When we arrive at the track and begin our practice runs, the temperature may be at a cool and pleasant 68 degrees Fahrenheit.  The car feels a little stiff but not enough to justify any changes to shock oils.  We then begin our first qualifier around 10 or 11am and the temperature may have increased to 80 degrees and the car feels great.  By the time the second qualifying race comes around its around 1pm to 2pm and now the temps may be around 100 degrees. You now do your second round of qualifying and your car is very soft and the rear end is bottoming on the jumps, "YEP" you forgot to account for the temperature change and the effect on the shocks.

So now you are waiting for the main event sheets to be posted but you are not sure if you will be one of the first races at 4pm or one of the last races between 9 to 10pm at night.  So again, not thinking it totally through in your mind, you remember you are bottoming out on the jumps and bumps, so you change your shock oil to a thicker oil by 50cst to 100cst more.  THIS IS A BIG MISTAKE, as you have to plan better and anticipate when your MAIN race will be (meaning approximately what time are you going to be on the track) and what might the temperatures be then? With today's smart phones, you have no excuse to not looking-up the hourly temp changes for your area on your favorite weather website.

In the example above, if you changed your shock oils to a thicker CST/Viscosity, say by going up 100cst to maybe a 600cst in front and now 500cst in the rear, in hopes of stopping the bottoming out of the RC on the jumps and bumps. You probably hit the track at lets say 8pm and the temperature is now 80 degrees. This oil change now just made your main event a lot tougher. 

You will remember, your original setup was perfect at 80 degrees in the first qualifier but now you just went up 100cst (front and back shocks) on your RC.  So guess what, your Main Event is going to be bumpy ride!!!!!  

Summary:

So to help you understand how much the temperature can effect your shock oil viscosity, we have included a nice chart that shows the test results of the effects of increasing or decreasing temperatures on the CST (viscosity) of the silicone shock oils from two major shock oil manufactures. The 40wt oils are usually around 500CST at room temps of around 75 degrees.  So assuming you have 40wt or 500cst Oil in your shocks to start with, the chart shows the viscosity rate in CTS increase or gets thicker as it gets colder and CTS decreases or gets thinner as it gets hotter. 

On the right hand-side of the chart is what we recommend you do based upon the temperature changing up or down by at least 10 degrees or more.
So a "Good Rule of Thumb" is to adjust your shock oils
by  2.5wt or 50cst for every 10 degrees in temperature change....
RC Silicone Shock Oil effected cst viscosity rates by temperature during testing
This Chart shows how the 40wt Oils viscosity changes (in cst) as the temperatures changed during testing.
So in closing, remember to always anticipate the temperature changes and how it will effect your shock setups throughout the day. This may be the difference of making it to the winners circle or just having a great run in the MAINs.

Good luck and we hope you find this information useful.

#RCpitTips #RCShockOilChart #TLRshockOilChart #AssociatedShockOilChart
1 Comment

Understanding RC Servo Torque Ratings

6/18/2019

5 Comments

 
Many people tend to not understand how the torque ratings on a servo are affected by the "hole" you select to connect your steering to on the servo horn. RC servo torque ratings are easy to understand once you understand what they mean and we have provided some visual examples to help you below. 

Torque Rating: The torque rating determines the maximum amount of force the servo can apply at a right angle to a lever (servo arm). This torque force specification is measured and listed in the servo specifications as ounce inches (oz-in) or kilogram centimeters (kg-cm). 

The larger the number, the more force the servo can exert. So this is helpful to use to help choose the correct servo strength based-upon the RC application.  For example, scalers and crawlers tend to get the wheels wedged in-between rocks and will blow-out a weak servo rather quickly. They need torque at 250oz/in or more to be safe. 8 scale buggy racers because of speed and weight also require a heavier torque rating.  Indoor 1/10 scale buggies tend to be around the 125 to 250oz/in range and on-road and RTR rc cars as a general rule are around 120oz to 175oz/in range.  Again these are just examples, and your driving style, type of driving surface, rc weight, skill level and more all play factors in choosing the correct servo torque for your personal liking.
​

So what exactly does 20 kg-cm or 240 oz-in mean? "And how is it affected by the "hole" you choose on the servo arm?"
Remember the Torque Rating is based on the distance from the center of the servo shaft to the hole selected in the servo horn.

Picture
Picture
So in the 20kg.cm example above, if the first hole from the servo shaft center is a 1cm distance, the servo torque is actually 20kg. The last hole on the servo arm is actually 1.4cm away from the center so your torque in this example would be more around 12kg.

In the second example the 240oz/in is actually the second hole as it is 1 inch away from the center of the servo shaft.

So with these examples, you basically can see that the "actual torque changes by the hole you choose on the servo arm". This is one of the main reasons so many people have issues with servos because they maybe actually no where close to the torque they need for the application if they do not measure distance and do some quick math. 
Picture
Servo Model :100T 
Recommended Application1/10 Surface 
Operating Voltage4.8V - 6.0V 
Operating Temperature14° to 140° F (-10 to +60° C)
Operating Speed @ 4.8V0.17/60° sec 
Operating Speed @ 6.0V 0.14/60° sec 
Dynamic Torque @ 4.8V 173 oz-in (12.5 kg-cm)
Dynamic Torque @ 6.0V 216 oz-in (15.6 kg-cm) 
The Protek 100T servo shown with the specs above is a great example of a servo that may work out well for most 1/10 scale type applications. But if you install this on lets say, a Tekno SCT410 short course truck, that is really a 1/10 scale short course RC that everyone installs 8 scale esc's and motors into in order to be competitive in racing. Then you also use the hole the farthest out on your servo horn, you may actually be more around 180oz of torque at 6.0v of power and the servo may not last more than a few months of hard racing.

Servo Operation Voltage: Oh yeah, power to the servo also will change the torque rating.  Most modern ESCs can be set to 6 volts and the higher-end ESCs can do 7.4volts or more in the settings. So always pay attention to this also as this is another reason servos fail because of lack of power to servo.

Servo manufacturers usually always provide specs for both speed and torque specifications in two common voltages used for receiver battery packs, 4.8 volts and 6.0 volts. This also translates over to the typical ESC & BEC's for voltage regulation for your electronics. Obviously the 6.0 volts gives slightly higher speed and torque ratings.
High voltage servos (HV) are starting to become more popular and are generally shown with speed & torque specs at 6.0V, 7.4V, & 8.4. These servos will continue to grow in popularity as 2S LiPo battery packs, along with higher current programmable ESCs/BEC's become more and more popular. 

As always we hope you find these tips helpful to your understanding of the RC hobby!!!
5 Comments

    Author

    RCcarStars technicians are always happy to provide our customers and fans with tips and tricks on maintaining your RC cars and trucks. 

    Archives

    May 2021
    November 2020
    October 2020
    August 2019
    June 2019
    May 2019
    March 2019
    January 2019
    December 2018
    July 2017
    April 2017
    December 2016
    July 2016
    June 2016
    May 2016

    Categories

    All
    Battery Tips
    Charging Tips
    General RC Info
    General RC Tips
    Product Reviews
    RC Kits
    RC Motor Tips
    RC Pit Products

    RSS Feed

©  2022. The content on this website is owned by RCcarStars.com. You may not copy, reproduce or distribute any content (including images) without our approval and written consent of RCcarStars.
RC Scaler Services RC Shock Duplication  RC Parts Intallation Service  RC Fluid Changing  RC Tire Venting  RC Star Foam Cutting Service
RC Maintenance Tips  RC Diff & Transmission Repair  RC Shock Tuning & Repair  RC Tire Shaving  RC Electronics Soldering Services
RC Electronics Waterproofing
  RC Tire Gluing  RC ESC Programming  RC Car Tune-Up  RC Kit Assembly Service  RC Car Repair Services San Diego
RC Straight Axle Services
 RC Transfer-Case Service​  RC Beef Tubes Installation  RC Maintenance Blog​  RC Discount Codes​  Tekno RC Kit Builds​
Traxxas Repair Services  Radio Control Repair Services  Associated B6 B6D HopUp Service  SKG Custom RC Body Painting
RC Motor Service ​ RC Brushless Motor Testing - Analyzer  TLR 22 5.0 Custom Builds  RC Body Painting Service  Crawler Scaler Services & Repairs 
​Traxxas Slash 4x4 Upgrades  ​RC Beadlock Tire Mounting  RC Parts & Chassis Dyeing  Sitemap